How the Tags Manager works
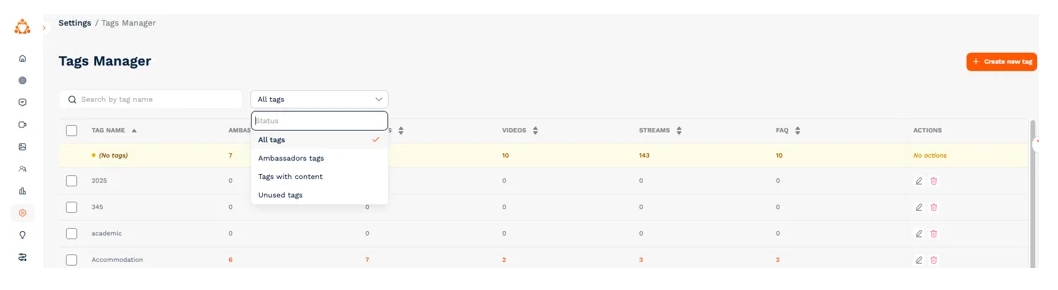
In the Tags Manager, you can:
- View all existing tags in your account.
- See how many ambassadors, videos, streams, and FAQs are linked to each tag.
- Filter tags by type (ambassador tags, content tags, unused tags).
- Edit or delete existing tags.
- Create new tags for campaigns, topics, or specific student groups.
Steps to create and manage tags
Tips for success
- Log in to your TAP admin dashboard.
- Go to Settings > Tags Manager.
- To create a new tag:
- Click + Create new tag (top-right).
- Give the tag a clear name (e.g. Philosophy Students, UG Offer Holders 2025).
- Save.
- To edit an existing tag:
- Click the pencil icon in the ACTIONS column.
- Update the tag name as needed.
- To delete a tag:
- Click the bin icon in the ACTIONS column.
- Confirm deletion (note: deleting a tag removes it from all associated content).
- To filter tags:
- Use the dropdown to view all tags, ambassador tags, tags with content, or unused tags.
- Use the dropdown to view all tags, ambassador tags, tags with content, or unused tags.
Tags help you:
- Group ambassadors by subject, location, or cohort.
- Organise content for specific campaigns or promotions.
- Create filtered TAP Feed links or dropdowns (e.g. “Postgraduate Ambassadors” or “Offer Holder FAQs”).
- Improve discoverability for prospective students searching your feed.
Tips for success
- Keep tag names short, clear, and consistent (e.g. use Business not Biz).
- Avoid duplicates like “Admissions” vs “admission” — check before creating new tags.
- Review unused tags regularly and clean up to avoid clutter.